


AI-generated cuddles: dumpling & me together using ComfyUI

This is a continuation from my last post, in which I trained a DreamBooth for my cat Dumpling. To have Dumpling and me in the same AI-generated picture, I trained a separate DreamBooth for myself and loaded both LoRAs in ComfyUI. I’ve been wanting to test out ComfyUI for some time. It allows users to design and run stable diffusion pipelines in a graphical interface, which is easy, intuitive but nonetheless very powerful.
This post is a quick recap of my text-to-image AI project. How to set it up and how the final output looks like. Here’s an example output for me and Dumpling below. Overall, I’d say it doesn’t take much effort to get started and obtain a 60% satisfactory result (e.g. hand is a known weakness for image models; neither Dumpling nor I look 100% like ourselves in real life; and I’m not sure why I’m always in traditional costume in these pictures). But to reach true mastery of the craft, you’ll probably have to invest a lot more time exploring and experimenting with different parameters and settings.

How to set it up
Train DreamBooth(s) for your specific subject(s), refer to my last post
Download your chosen checkpoint. And convert the safetensor file to a version compatible with webUIs, refer to code here
(Optional) Upload the webui-compatible safetensor files onto HuggingFace
You can setup ComfyUI remotely on Modal. Adapt from this example and change all the models downloaded into the image accordingly. My DreamBooths were fine-tuned from SDXL base 1.0, so I’m going to download that into the /checkpoints folder instead of Flux. Then download your DreamBooth LoRAs into the /loras folder. My code example below:

Run the edited file from your command line with: modal serve 06_gpu_and_ml/comfyui/comfyapp.py. You’ll see Modal starts downloading all the dependencies and models, then a URL link created for your ComfyUI app. Click and launch. That’s it!
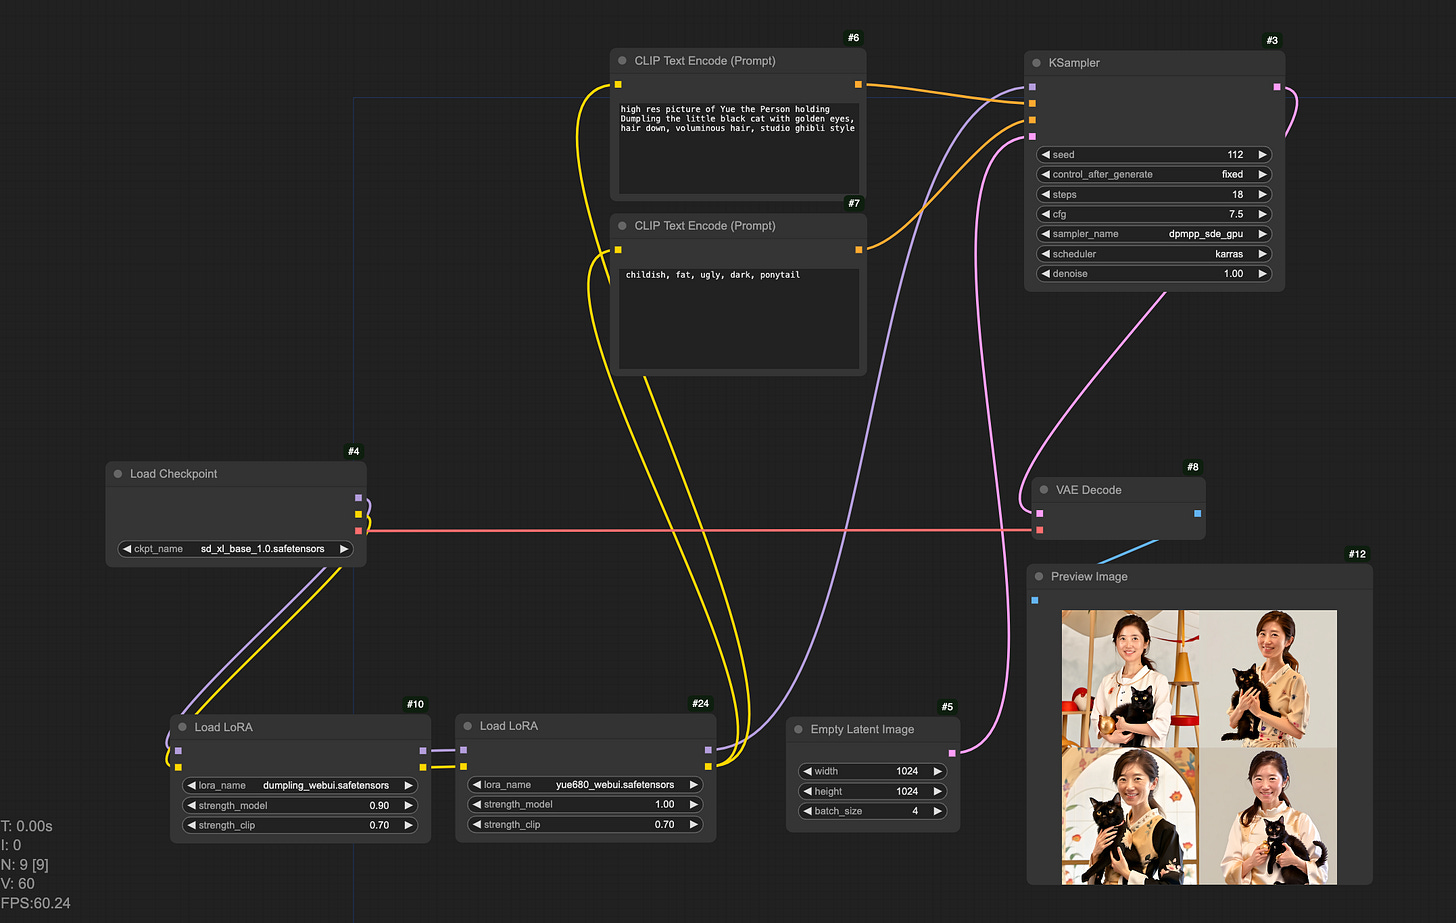
There are lots of great tutorials on how to use ComfyUI if you are interested to go deeper (I like Scott Detweiler’s youtube channel). But to get started quickly, you can load the default workflow (find “Load Default” button RHS), change the base model by clicking on the “Load Checkpoint” node, also right-click on the empty space to load the LoRA nodes.


How diffusion models work
Working with ComfyUI is mostly straight forward. I bet you’ll end up spending a lot more time than you wanted because it’s incredibly fun, and there are so many things to play with. When I first got started however, I was a little bewildered by what all the different nodes do. To understand why each component is needed, we have to go back to how test-to-image diffusion models work. If you have a bit of time, I highly recommend reading Jay Alammar’s illustrated stable diffusion. Without going into complicated maths, it illustrates how SD works so well and makes one marvel at the raw genius and brilliance of its inventors. Here’s how I make sense of SD:
Diffusion is the process where noise is gradually introduced to an image. Intuitively at early stages, a pair of human eyes can still decipher what the original image was about. However, over time the corrupted image would look like pure noise
It is possible to train a noise predictor to reverse this process. Eliminating (predicted) noise step by step, you will have the original image back
To speed up the process, scientists invented a way to transform pictures, noises, predictions into numbers in higher dimensions. This higher dimension space is also known as “latent space” and numerical representations of picture/noise/anything is called “embeddings”
Having all the actions in the latent space also makes text conditioning possible, because text prompts can be translated into embeddings in the same latent space. During training, model weights that translate to a higher cosine similarity between the image embedding and text (which is the image label) embedding are picked
Now run everything backwards, you get our text-to-image diffusion model. The positive and negative text prompts get translated into embeddings in the latent space (CLIP text encode), sort of “conditions” the random noise starting image (empty latent image). Noise predictor (sampler, scheduler) then starts subtracting away predicted noise step by step. So far we are still in the latent space. Finally latent embeddings get translated back into pixel space (VAE decode) and we have our generated picture
Mind blowing right? How did people even come up with these ideas, and what a leap of faith it must have felt to say I’m going to make a picture out of pure noise!
Alright that’s all for this post. Although I’m not very happy with the DreamBooth of myself, I’m going to take a break from image models for now. Next, probably try something in voice?
Ciao, a presto~